 RequestBin Blog
 Webhooks — The Definitive Guide [2019]
April 16, 2019
Looking to learn more about webhooks? You’ve come to the right place. We’ll cover everything you need to know about working with webhooks in 2019.
To get the most out of this guide, you’ll need a basic understanding of HTTP. If you need a refresher, check out our HTTP glossary, or see the references here and here.
Have a specific question about webhooks? Skip to that section below, or reach out if you can’t find the answer you’re looking for.
- What Is A Webhook?
- Webhooks vs APIs — What’s The Difference?
- How Do I Process Webhook Requests?
- How Do I Test & Debug a Webhook?
- How Do I Secure a Webhook Integration?
- Example: Send new Github issues to Discord
- Step 1 — Create a RequestBin URL for debugging
- Step 2 — Create a test Github repository
- Step 3 — Enable webhook events for new issues
- Step 4 — Use RequestBin to make sure everything looks OK
- Step 5 — Configure a Discord channel and incoming webhook integration
- Step 6 — Configure Github to send issues to Discord
- Step 7 — Improve this integration
- Who Supports Webhooks?
- Webhooks Glossary: Common Terms
What Is A Webhook?
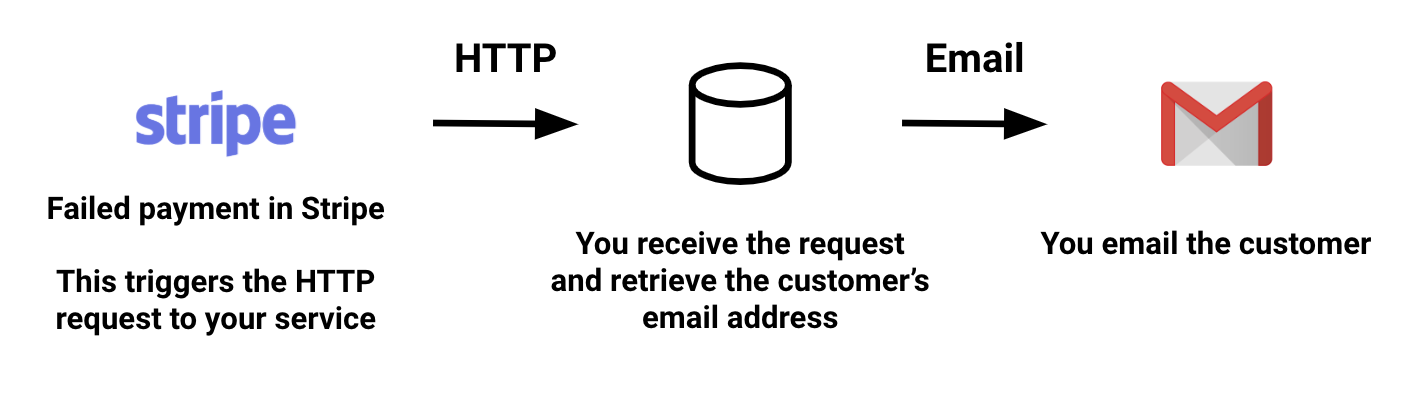
A webhook enables third-party services to send real-time updates to your app. Updates are triggered by some event or action by the webhook provider, and pushed to your app via HTTP requests. When you receive the request, you handle it with some custom logic, like sending an email or storing the data in a database.
For example, let’s say you use Stripe — a payments service — for billing, and want to automatically email customers for failed payments. Here’s how a webhook might work:
- You charge a customer that subscribes to your service, and the payment fails.
- You’ve setup a webhook in Stripe to send real-time updates of failed payment to some web service you own. So Stripe sends you the failed payment notification via HTTP.
- You receive the HTTP request, parse it, and email the customer.
Stripe will serve as a common example in this guide, since billing is a common problem, and since Stripe provides detailed developer docs with plenty of webhook examples and best practices.
Here are some other examples of how you can use webhooks:
- When someone mentions your company on Twitter, you want to send a message to your #social-mentions Slack channel.
- You host an open source project on Github. When someone submits an issue, you want to comment with a “we’ll get back to you soon” message, and send a notification to your team’s #github-issues channel on Discord.
You may have used APIs — application programming interfaces — and might be thinking, I can do all of this with APIs. Why do I need webhooks?
Let’s review the difference between APIs and webhooks, and why you might choose to use one, the other, or both.
Webhooks vs APIs — What’s The Difference?
Many services provide both APIs and webhooks to move their data into your app. You can often get the same data using either method. Stripe, for instance, allows you to retrieve billing-related events — charges, subscriptions, etc. — from their API and webhook integrations. So what’s the difference?
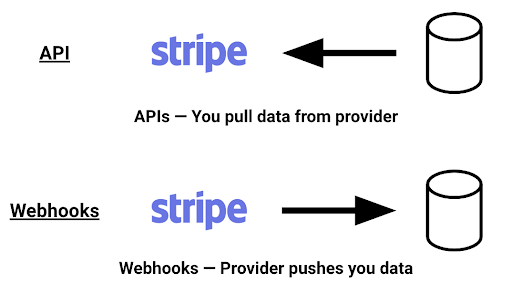
With APIs, you pull data from the provider. But webhooks allow the provider to push data to you.
Pulling data from an API will work perfectly fine for most use cases. In fact, many apps only provide APIs, and not webhooks, so it might be your only option.
But pulling data from APIs can:
- Waste time — your app will make requests to the API even when there’s no data to pull from the service.
- Cause delays — you’ll have to poll the API frequently to ensure you get the most up-to-date data. If you’re building an app that requires real-time updates, even once-a-minute pulls can be too slow.
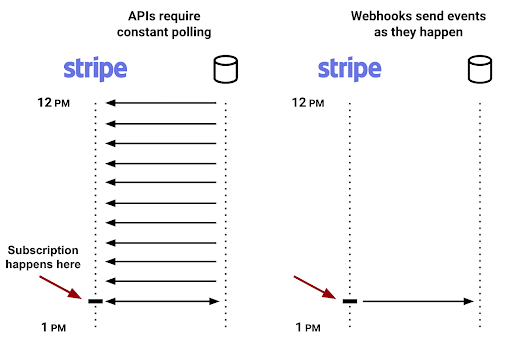
With webhooks, the provider does the work for you. They push real-time updates as they happen; you’re not polling the service to ask for new data.
Why information lag can be a problem
We’re integrating our apps with more and more third-party services. We make decisions using data from those services, so depend on the data being up-to-date.
Let’s compare a Stripe API integration with an equivalent webhook setup to see how out-of-sync information from the API could be problematic.
Using an API
Let’s say you use Stripe for accepting payments, and you send your accounting emails using a separate tool. Your accounting system sends out a past-due email when an invoice — paid in Stripe — is 30 days late.
You pull Stripe payments data into your accounting system once an hour. If a customer pays an invoice in Stripe, your accounting system won’t know until it syncs data again, and may send the past-due email even though the customer already paid. Your customer probably won’t be pleased.
Using webhooks
As soon as customers pay their invoices, Stripe sends a webhook event to your accounting system and you update their records as paid. Your accounting system always has the most up-to-date payment data, so you don’t send the past-due email.
So why don’t we always use webhooks? Are APIs no longer useful?
When to use webhooks, APIs, or both
We’ve seen that polling for updates via API can consume unnecessary resources, and lead to data lag between our applications. So why are APIs useful?
- Sometimes, an API is all you’ve got. Not all services provide webhooks, so you might have to integrate with the API to get the data you need. For example, Quandl — a finance data service — only provides an API, not a webhook.
- Sometimes you care more about high-level stats, not individual events. Webhooks typically send HTTP requests to your app for every event. So when a single user subscribes to your service, Stripe sends a webhook request for that event. But you may only care about the total number of active subscriptions, which you can retrieve easily via a single request to Stripe’s API.
- To make changes, you need an API. Webhooks are great for sending one-way notifications from the webhook provider to your app. But you often want to react to that notification by taking some action in the third-party service. For that, you need an API. For example, when a user submits a new issue in Github, you can reply with a new comment using the API.
- Webhooks contain data, but not always metadata. Webhooks typically send small messages, for example telling you know that user 123 took some action X. Often these messages don’t contain other useful metadata about that user or the event. But you can typically query the API for that metadata. For example, when a customer’s free trial is about to end, Stripe will send you a webhook notification, and you can make a request to Stripe’s Customer API endpoint to confirm that customer has a valid payment method on file and retrieve other metadata.
If you’re building a moderately complex app, you’re likely to end up using both.
Take the time to read the developer docs for your services to find the right way to get the data you need. If those docs lack examples or code samples, blog posts might provide good walkthroughs. StackOverflow can help you resolve common issues that the provider failed to document. And before you write a line of code, look for apps others have built using these APIs or webhook integrations on Github: for example, this Stripe webhook dashboard. Someone else may have already developed a tool that solves your use case.
How Do I Process Webhook Requests?
To process webhook requests in your own app, you’ll have to configure:
- A publicly accessible URL (endpoint) that your webhook provider can send HTTP requests to.
- Custom application code that runs in response to new HTTP requests sent to this endpoint. For example: sending notifications to Slack or email; updating a database; making another API call. You can even send another HTTP request to a different system, effectively creating a webhook of your own.
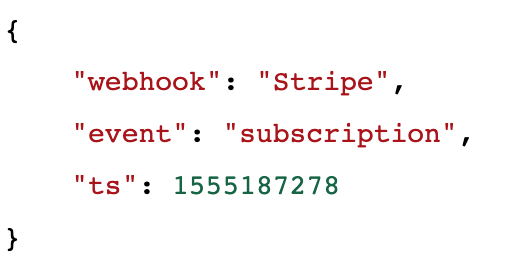
Most modern webhook providers send events via HTTP POST requests with a JSON payload, like Stripe:
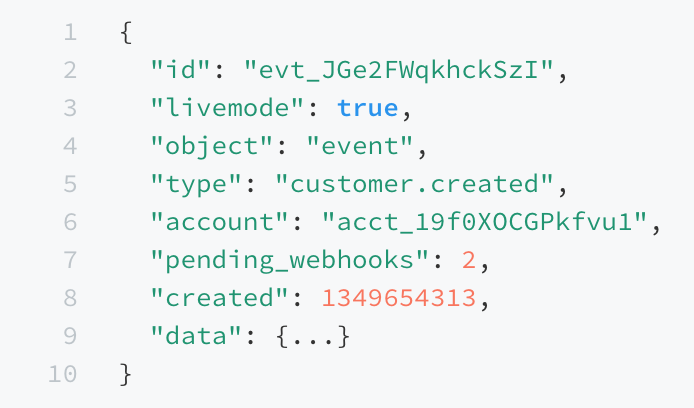
Occasionally, providers will send events using a different payload type (XML or URL-encoded form data), or, rarely, using an HTTP GET request, with data encoded in the path or query string parameters.
If you’ve ever written code to handle HTTP requests, you can process webhook events.
If you haven’t worked with HTTP requests before, see our glossary or read this helpful guide to learn more.
How Do I Test & Debug a Webhook?
When you integrate a new webhook, a lot of issues can arise:
- You might not receive any requests to the endpoint you setup, and you’re trying to figure out why.
- The webhook provider doesn’t have any sample webhook events in their docs, so you need to generate examples (often JSON payloads) to use when writing and testing your code.
- Some webhooks send a high volume of requests. When you first configure your endpoint to receive webhook requests, you might get more than you expected, and your app might crash under load.
We built RequestBin to help with these and other webhook debugging issues. You can use RequestBin to create a public endpoint to receive and inspect HTTP requests from any source, and easily inspect the headers, payload and more.
If you’re testing a service that passes sensitive data, first look for features in the webhook provider’s settings to send test data — Stripe, for example, provides a "test mode" for webhooks. This way you don’t have to send customer data just to debug your integration.
RequestBin also provides a few ways to secure your data:
- Create a private endpoint (requires registration).
- Use the default, secure (HTTPS) endpoint URL.
- Delete the events sent to an endpoint when you’re done testing.
See the RequestBin docs for more information, or feel free to reach out to our team with any questions.
Other Useful Tools For Debugging/Testing Webhooks
- NGrok - ngrok is a command line app that exposes a public endpoint from your computer for testing, and lets you inspect and replay events from a web browser.
- Postman - Postman is a native app for sending HTTP requests to APIs and other web services. If you like working with an app instead of the command line, Postman is for you.
- HTTPie - HTTPie — aitch-tee-tee-pie — is a command line HTTP client with an intuitive command interface, JSON support, syntax highlighting, wget-like downloads, plugins, and more.
- cURL - cURL is a command line utility for making HTTP requests.
- Hurl.it - Make web requests directly from your browser (hosted by Pipedream).
How Do I Secure a Webhook Integration?
Webhooks deliver data to publicly accessible URLs. This means that anyone — the webhook provider, or anyone else on the internet — can send HTTP requests to your endpoint. Luckily, there are a number of ways to secure your data and your endpoint.
Use HTTPS
Data transmitted over the Internet should always be encrypted. Without encryption, anyone sitting between your browser and the server from which you’re fetching data can read what you send and receive.
On the web, encryption happens using HTTPS: the data sent and received is encrypted before it’s sent over the internet, and decrypted only by the receiving party. No one in the middle can snoop on what you’re sending.
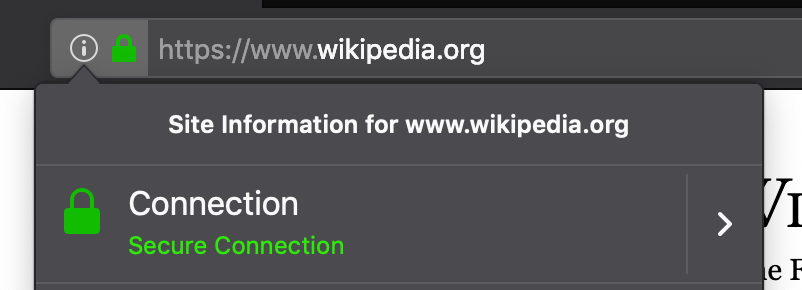
Most modern browsers give you visual confirmation that the site you’re visiting is secure:
Webhooks are no different. You want to ensure the sensitive data sent from the webhook provider to your endpoint is encrypted. Your endpoint URL should support HTTPS, and you should add that secure URL to your webhook settings.
Some webhook providers will validate that your HTTPS URL is secure — for example, that the TLS certificate is valid — before sending data. Others don’t perform this validation or force you to use HTTPS, so it’s critical you confirm this on your own.
Pass secrets or tokens
Most webhook providers allow you to pass a secret or a “token” in every webhook request. For example, Github:

This secret is typically passed as an HTTP header, as a field in the JSON payload, or appended to the request URL. When you confirm the token you received is the one you expected, it helps validate the request was sent by the webhook provider.
Accept Only Signed Requests
Some webhook providers (for example Stripe) can “sign” webhook requests.
Given this digital signature, you can verify that the webhook request was generated by the webhook provider, and not from some server acting like the webhook provider.
Since the signature is specific to each and every webhook request, it also helps you validate that the message wasn’t intercepted and modified by someone in between you and the webhook provider.
The provider will typically document how to validate the signatures it generates. But not all providers generate signatures. Consult the docs for your service to learn more.
Whitelist The Webhook Provider’s IP addresses
If you operate a firewall in front of your endpoint, or can otherwise restrict HTTP traffic from specific IP addresses, you can limit the IPs that can send your endpoint data.
Stripe, for example, publishes the IP addresses of the servers they operate, so you can accept Stripe webhook events from only those IPs.

This can be technically complex to manage, especially when the IP addresses of the webhook provider change, like Github’s. Because of this complexity, Github says:
We do not recommend whitelisting by IP address.
Not all providers support the best practices noted above. This also isn’t an exhaustive list — some providers may recommend even more steps.
If you’re processing webhooks using an app developed by the webhook provider, or the open source community, and you don’t own the code, make sure to review their docs or ask them questions to confirm they abide by security best practices.
In general, always consult the security section of the webhook developer docs for your service, and always consider the specific security requirements for your app and your users.
Example: Send new Github issues to Discord
Below, we’ll walk you through how to connect two common apps — Github and Discord — using webhooks.
If you’re new to webhooks, it can be helpful to see how an end-to-end integration works. If you don’t already use Github or Discord, you can create free accounts for both. If you want to walk through this example, create those accounts before moving on.
Step 1 — Create a RequestBin URL for debugging
Before we send Github webhook events to Discord, we’ll confirm our webhook is working by sending test requests to RequestBin.
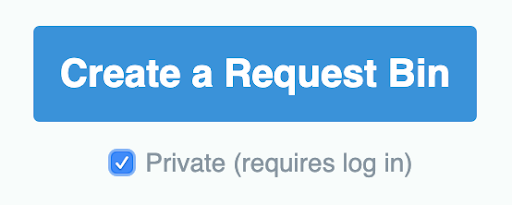
Visit RequestBin and click Create a Request Bin. We also recommend checking the “Private” checkbox below, to make sure only you can view requests sent to this bin (requires log in):
Once your bin has been created, you’ll be given an endpoint URL you can send requests to:

You’ll see a long set of letters and numbers in place of “your-endpoint” in the screenshot above.
Keep your URL - we’ll use it in a moment.
Step 2 — Create a test Github repository
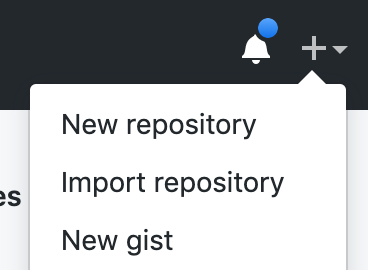
After logging into Github, create a new repository by clicking on the + in the top-right corner and choosing New Repository:
We’ll call this repo my-test-repository, and set it Private since we’re just using it for testing:
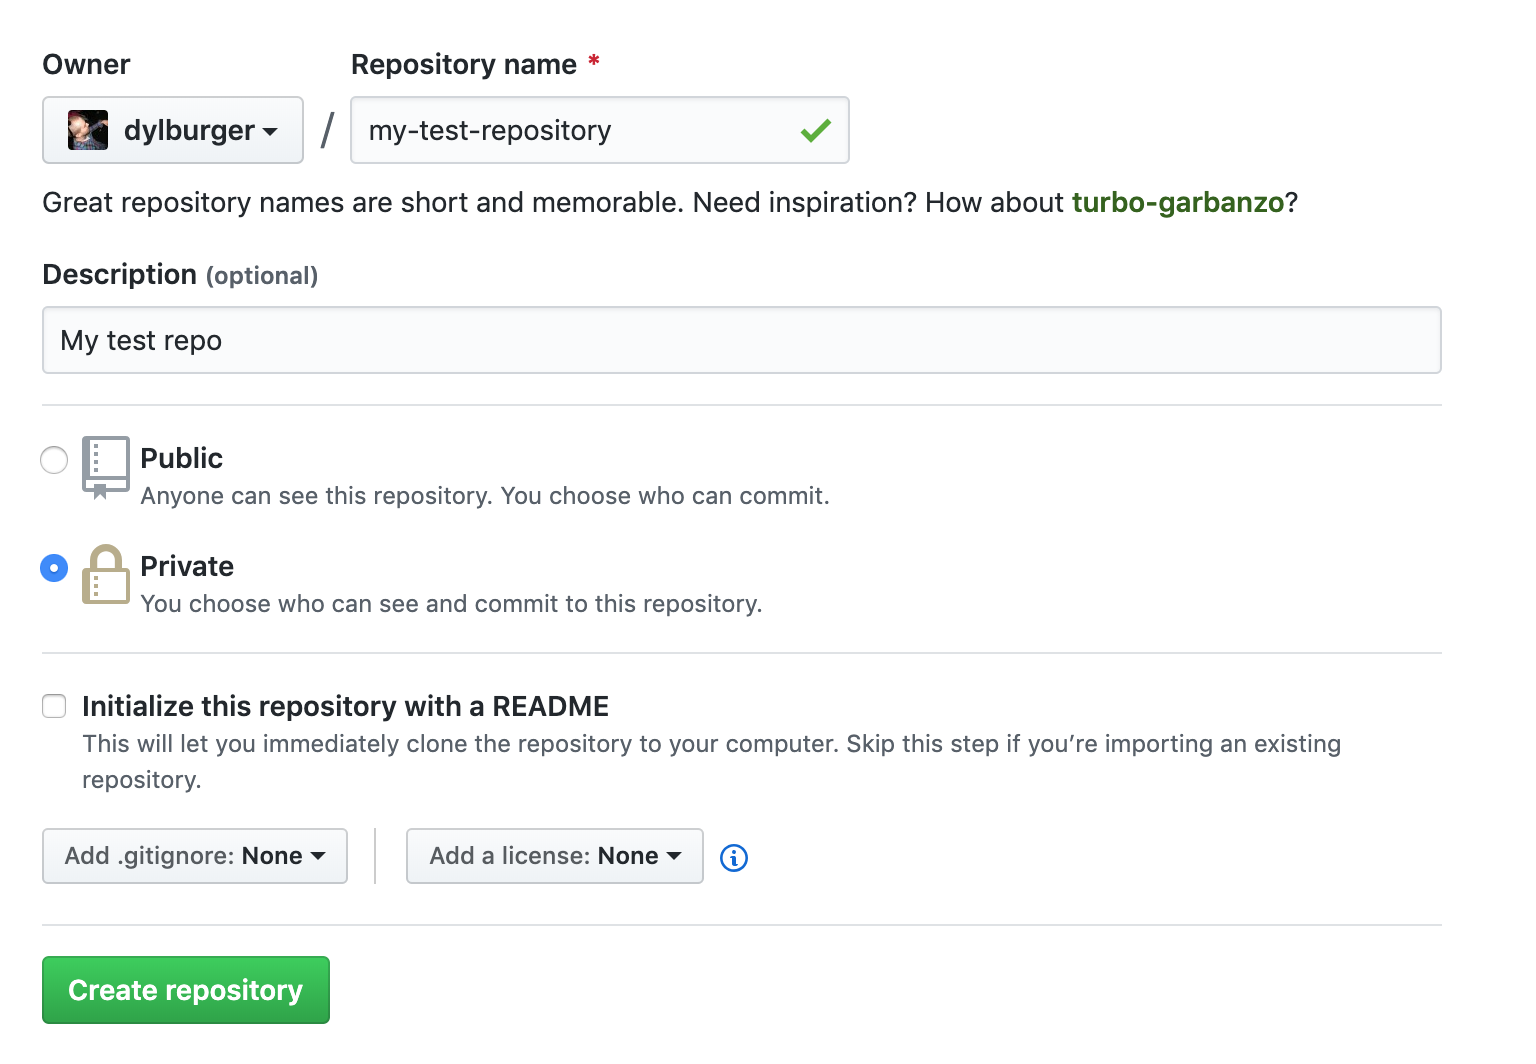
Click Create repository, and you’ll land on the Code tab of your repo.
Github will prompt you to add your first commit — your first code — to the repo. We’re not going to do that. You can stop here and move to Step 3.
Step 3 — Enable webhook events for new issues
We want to trigger webhook events when a new issue is created in our repository.
Users file Github issues for bug reports, feature requests or other questions they have about a project. Developers like to respond to these issues quickly, so we’d like to use a webhook to tell us when new issues are raised.
After creating your repo in Step 2 above, click on the Settings tab:

and then on the Webhooks option from the list below:
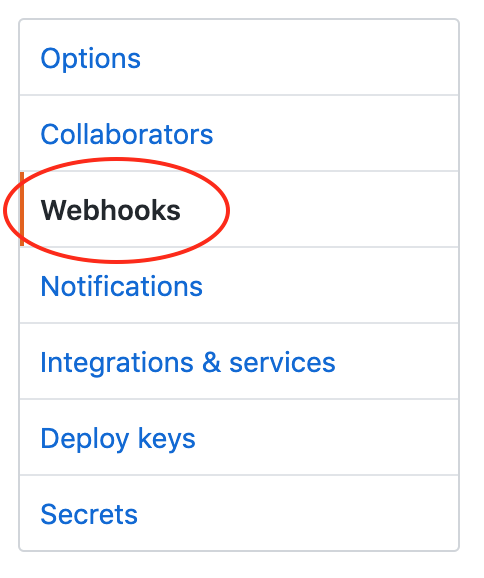
Click the Add webhook button near the right of the page:
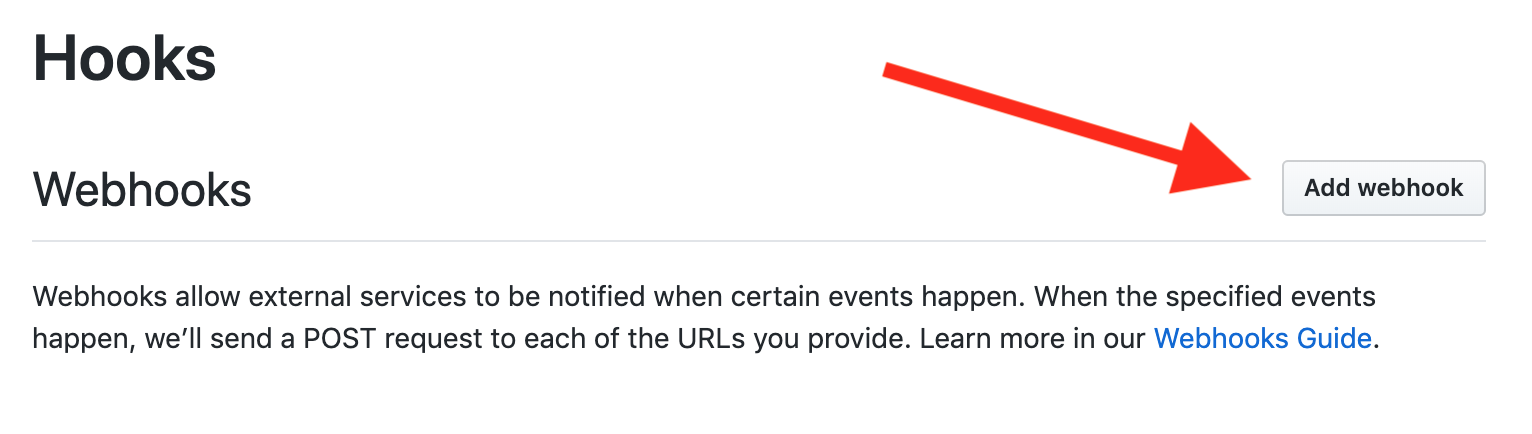
There’s a bit of information you’ll need to configure on the next screen:
Set the Payload URL to the endpoint URL you created in RequestBin in Step 1 above.
For Content type, select application/json, instead of the default application/x-www-form-urlencoded.
Add a test Secret here for now — whatever value you’d like — so you can see how Github passes this value in HTTP requests.
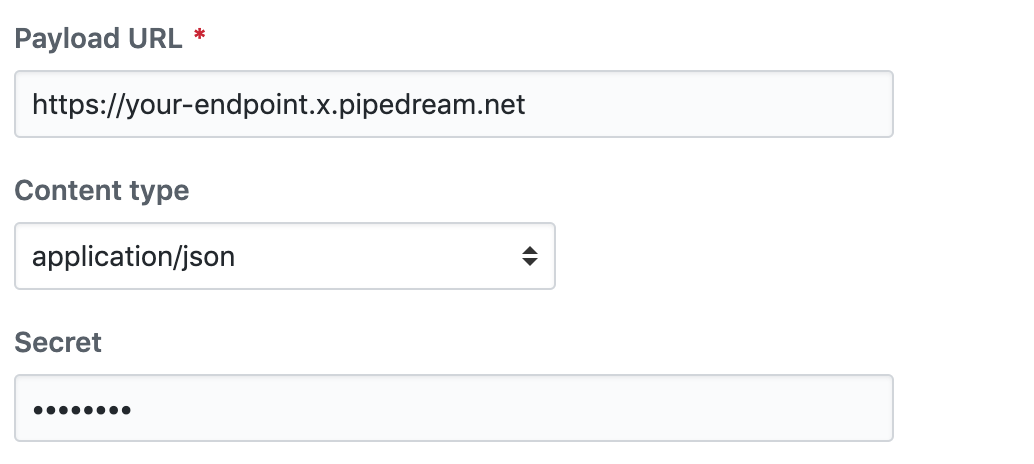
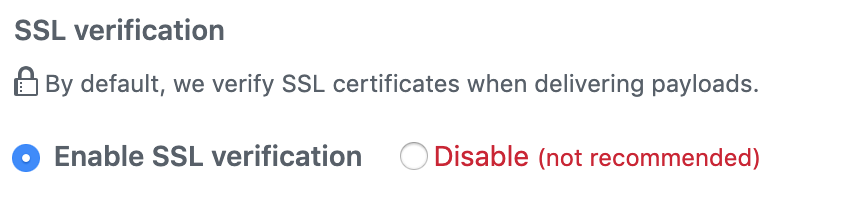
Keep SSL verification set to “Enable SSL Verification”:
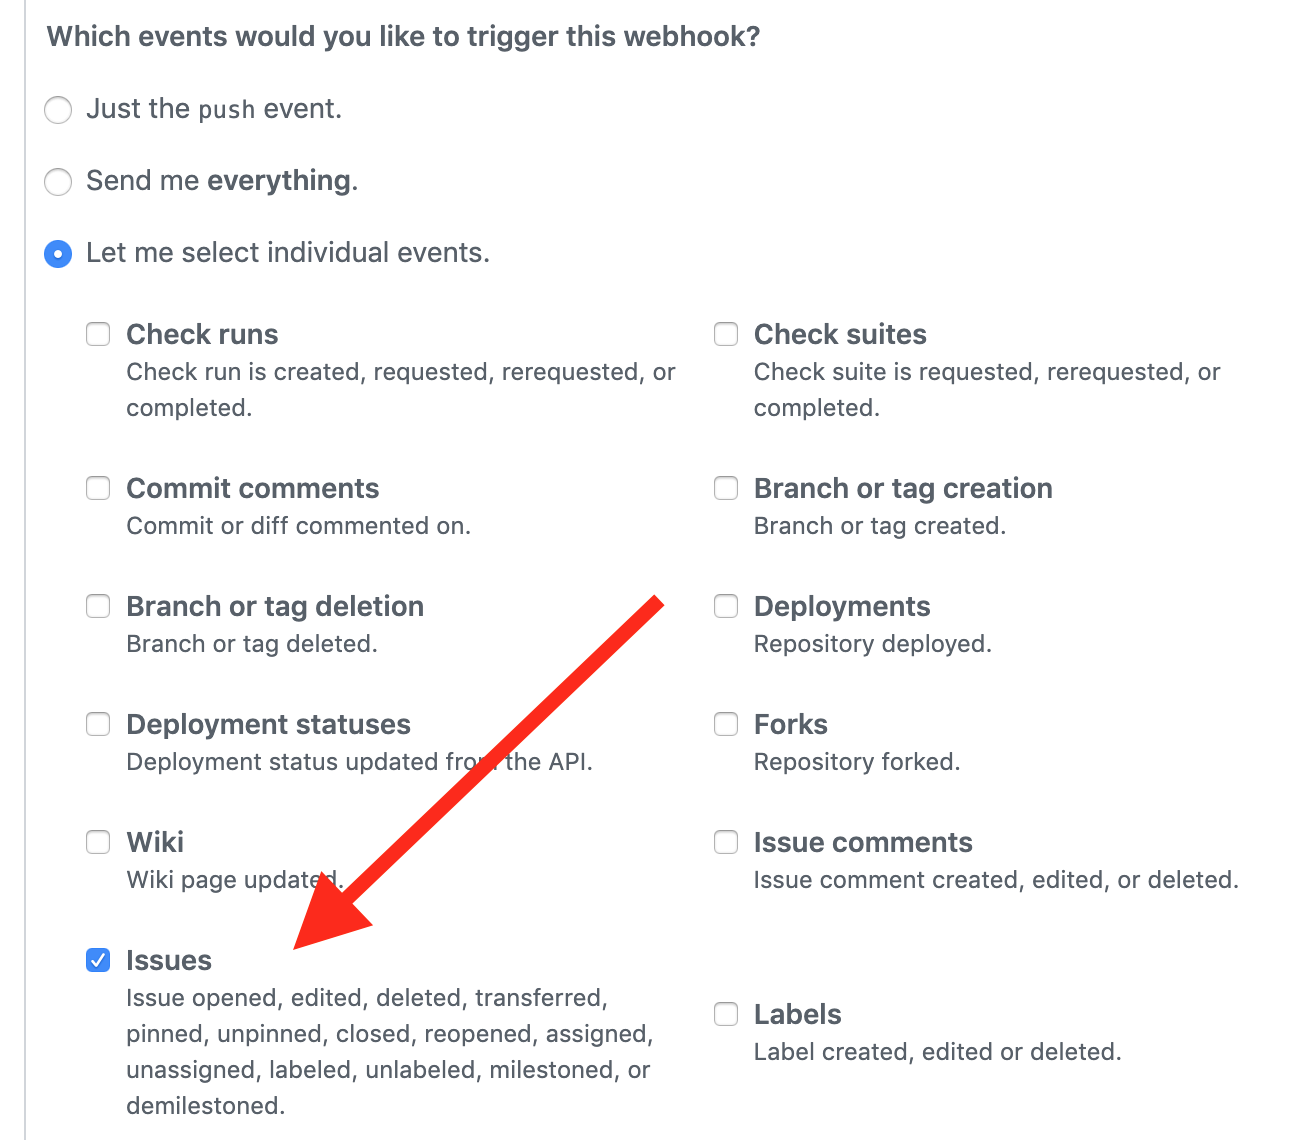
In the section that asks Which events would you like to trigger this webhook?, select only Issues:
Finally, make sure your webhook is Active (it should be by default):

Back in the webhook settings for this repo, you should see this new webhook configured in the list with a green check mark showing that Github sent a test request and that your endpoint responded correctly. Click on the webhook and scroll to the bottom. You should see the test request along with the response from RequestBin:

Step 4 — Use RequestBin to make sure everything looks OK
It looks like RequestBin received the request OK, since Github received a 200 OK response. Let’s visit our bin — the page you landed on after creating the endpoint in Step 1 — to confirm.
We see the test event from Github in the list of requests on the left:

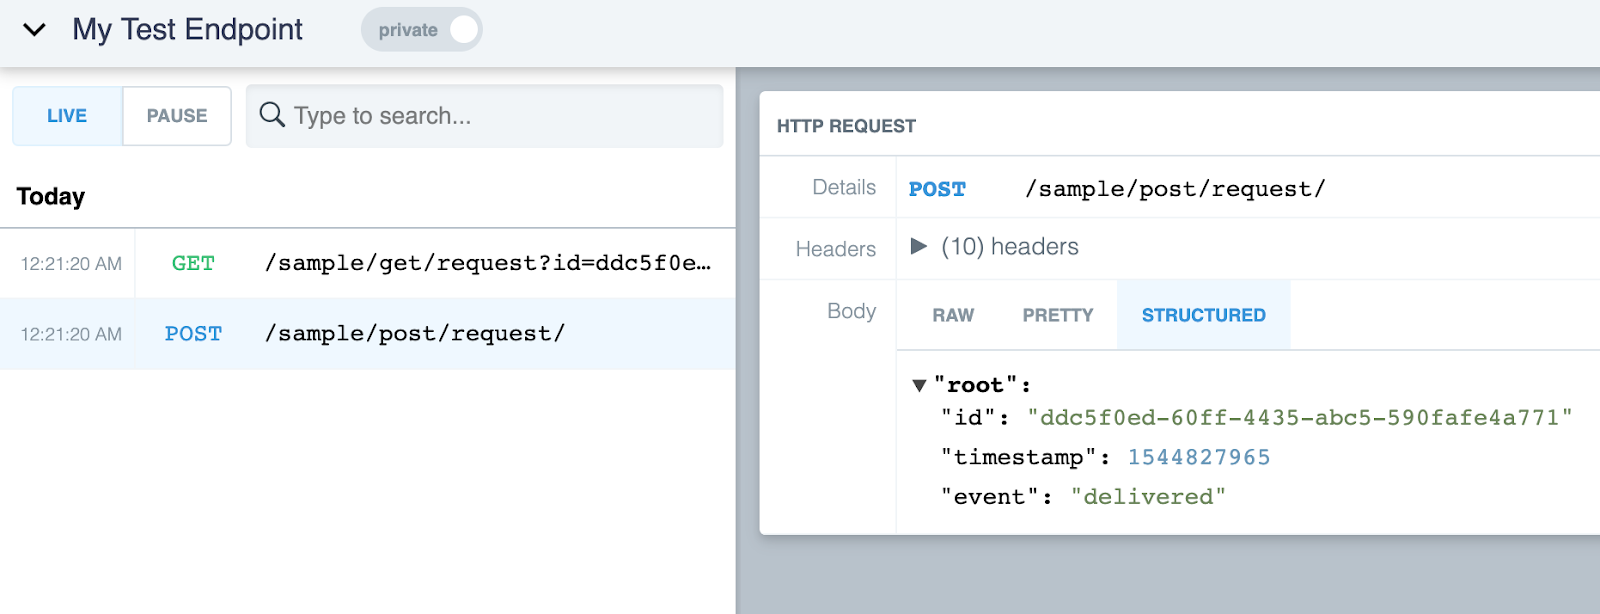
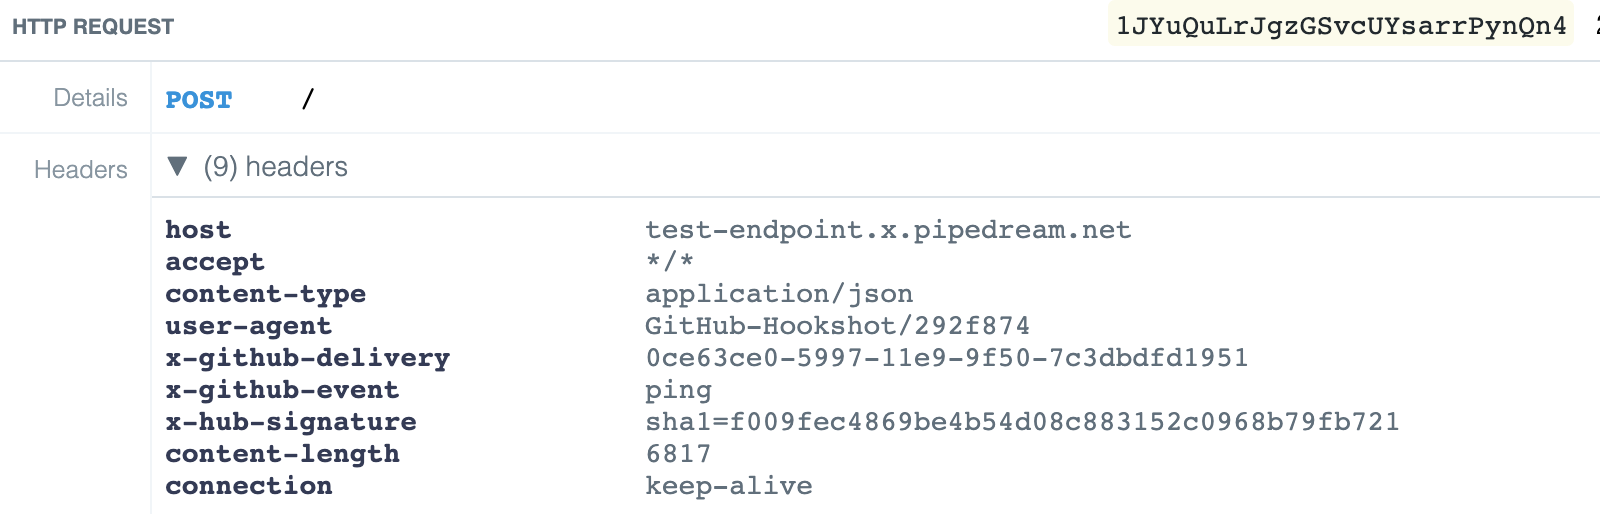
Clicking on the request shows us the HTTP headers Github sent on request...
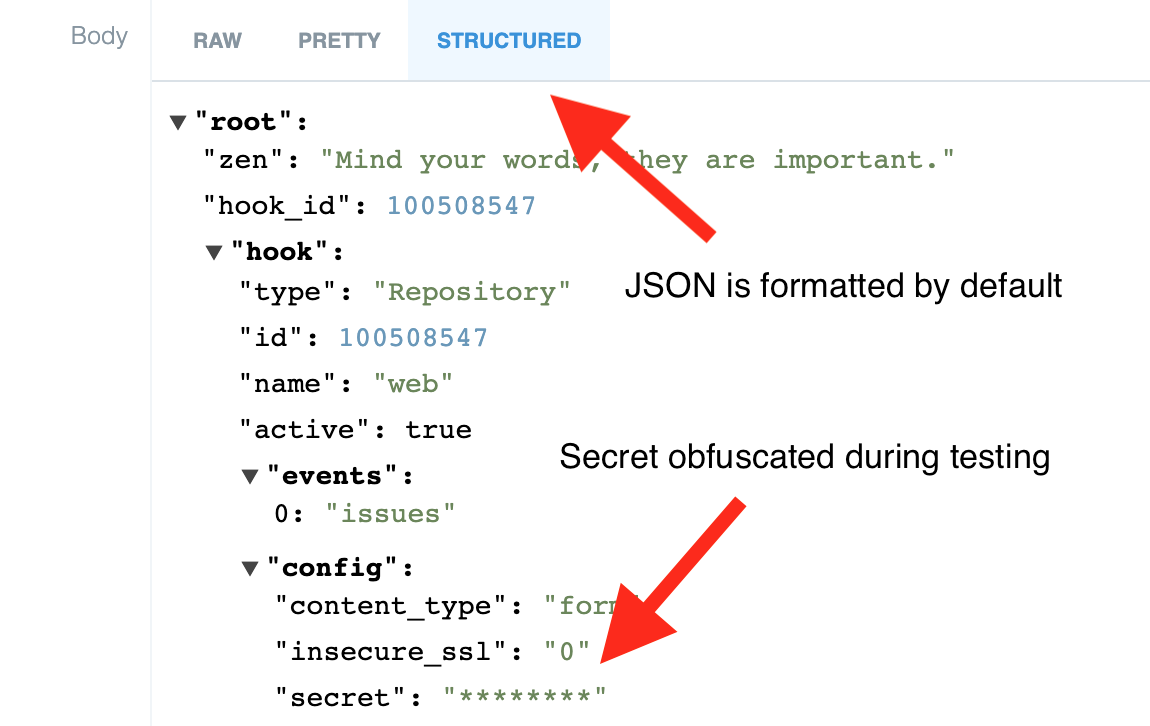
and the JSON payload below it. Since RequestBin recognizes the payload as JSON, it formats it. Note also that Github obfuscates the secret we configured when you’re testing:
At this point, we’ve got a lot of information that will be helpful for any Github webhook integration:
- We know where our code needs to grab the webhook secret from the JSON payload.
- We know we can validate Github’s signature on the request using the value of the
X-Hub-SignatureHTTP header. - This JSON has a complex, nested structure. Seeing the formatted payload helps us grab the right values from the right place if we need to process the JSON in a custom way.
For now, we’re just going to send the webhook requests directly into a Discord channel, to wrap up the end-to-end example.
Step 5 — Configure a Discord channel and incoming webhook integration
First, if you haven’t already, create a new Discord server. If you’re used to Slack, a server is analogous to a workspace. It should take less than a minute to create this server end-to-end.
Next, add a new channel in Discord where you want to receive Github issues. We’ll call ours #github-issues:


Once created, edit your channel’s settings:
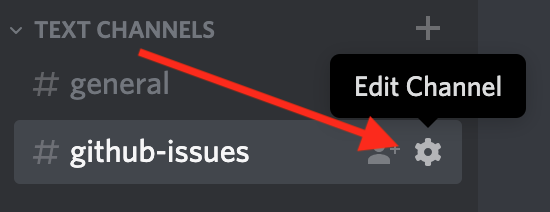
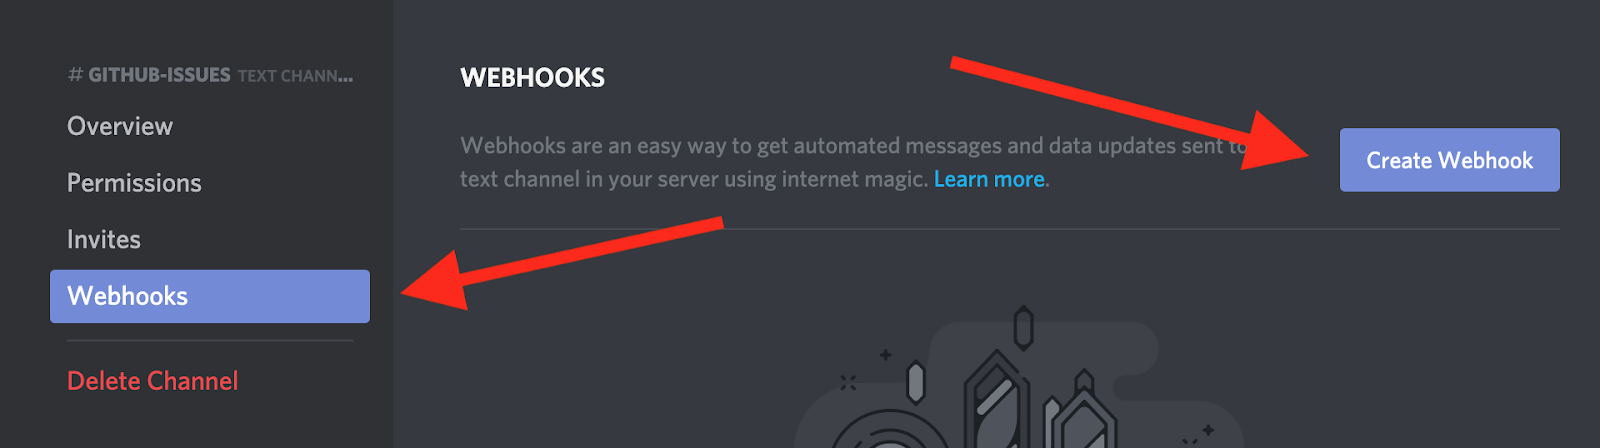
Select Webhooks, then click Create Webhook:
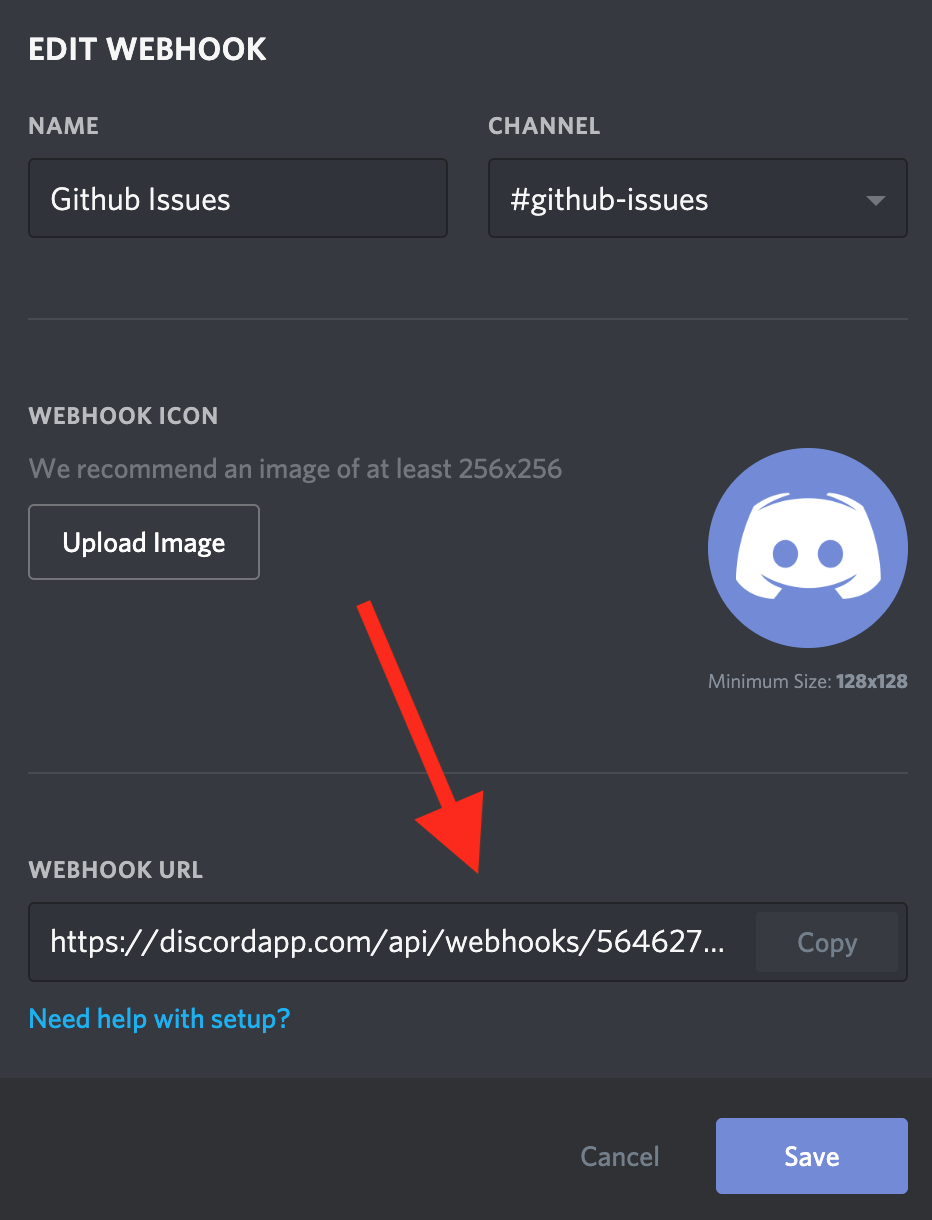
Call the webhook “Github Issues”, and make sure to copy the Webhook URL Discord generates for you:
Step 6 — Configure Github to send issues to Discord
In your Github webhook settings (see Step 3), change the webhook Payload URL to the Webhook URL from Discord above, adding “/github” to the end:

Discord implements custom logic to process the JSON payload Github sends, but only applies that logic for requests sent to the /github endpoint (see the Discord webhooks guide).
The URL Discord generates should look like:
https://discordapp.com/api/webhooks/123/456/
You’ll want to add /github to the end so it looks like:
https://discordapp.com/api/webhooks/123/456/github
Save the Github webhook and navigate to the Issues tab of your repo:

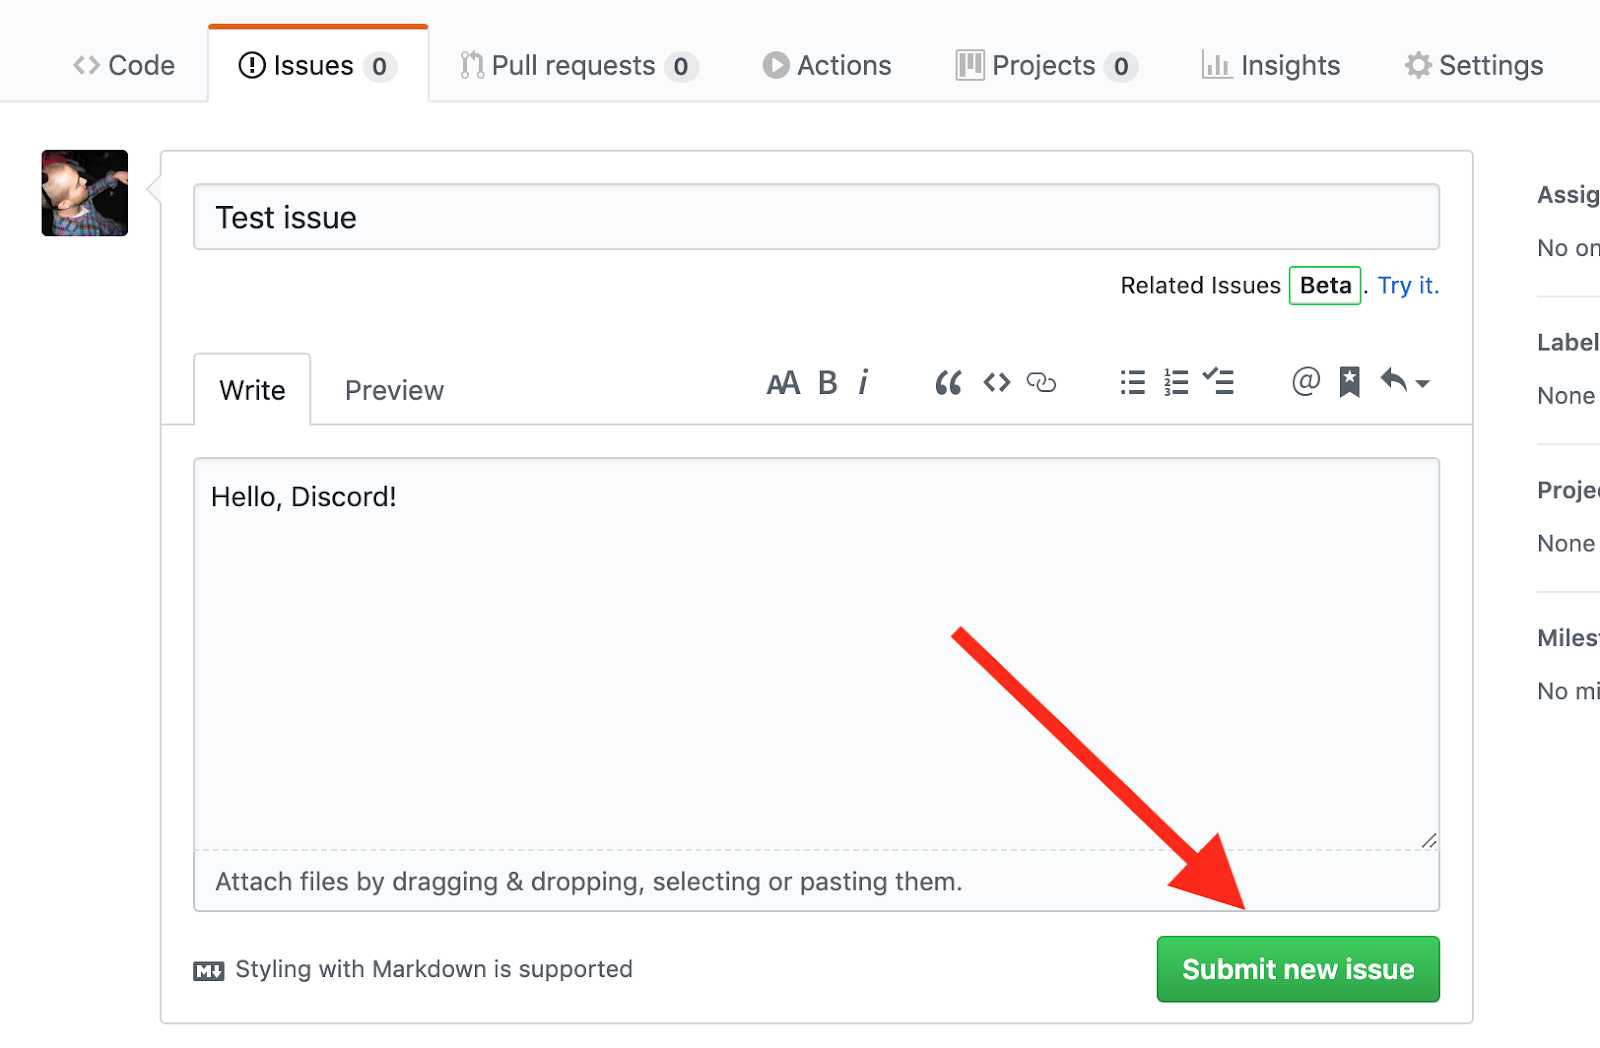
Open a New Issue:

Fill in the title and description, and click Submit New Issue:
If everything was configured correctly, you should see a new message in your test Discord channel:

Step 7 — Improve this integration
There’s a lot more you can do to extend this integration. Search Github for some apps that help process Github webhooks, or read the Discord developer docs to see how you can build a bot or some other app.
There’s so much you can build using webhooks — there’s truly no limit to what you can do!
Who Supports Webhooks?
Once you start using webhooks, you’ll find that they are widely supported by the services you use. Most major applications that provide an API also provide an option for delivering (or receiving) data via webhooks.
Here are some of the most popular applications that support webhooks in 2019:
- Paypal
- Slack
- Quickbooks
- Github
- Google Drive, Gmail, and many other Google Apps
Webhooks Glossary: Common Terms
HTTP
The Hypertext Transfer Protocol.
A protocol is just an accepted standard of communication, like how you introduce yourself to someone when you first meet.
HTTP is a protocol that dictates how programs like web browsers transfer data (“hypertext”) from a web server. Your web browser and the server communicate in a very specific way to negotiate for the resources — all the HTML, images, and other content — that your web browser needs. This is the protocol in action.
Technically, you’ll hear your web browser referred to as a “client” in HTTP-speak. Clients fetch data from servers.
Millions of web servers host millions more websites. You want to access all of them without knowing what how the web server works — you just want the website. Luckily, every web server speaks HTTP. Your browser speaks HTTP. So when your browser makes a request to fetch Google or Wikipedia, everyone’s talking the same language.
Imagine if your browser had to learn a new protocol for every new website you visited. It would be unsustainable. Like all technical standards, HTTP is magical and underappreciated.
Since HTTP defines how data moves on the web, it’s pretty important for understanding how webhooks work. Learn more here and continue reading below.
HTTP Request
When your browser fetches data from a web server, it makes a request for that data using HTTP.
A web server can host a lot of data, so when you make an HTTP request, you need to be specific about what data you’re looking for.
HTTP defines how clients request this data from servers. We’ll cover how HTTP requests are constructed below.
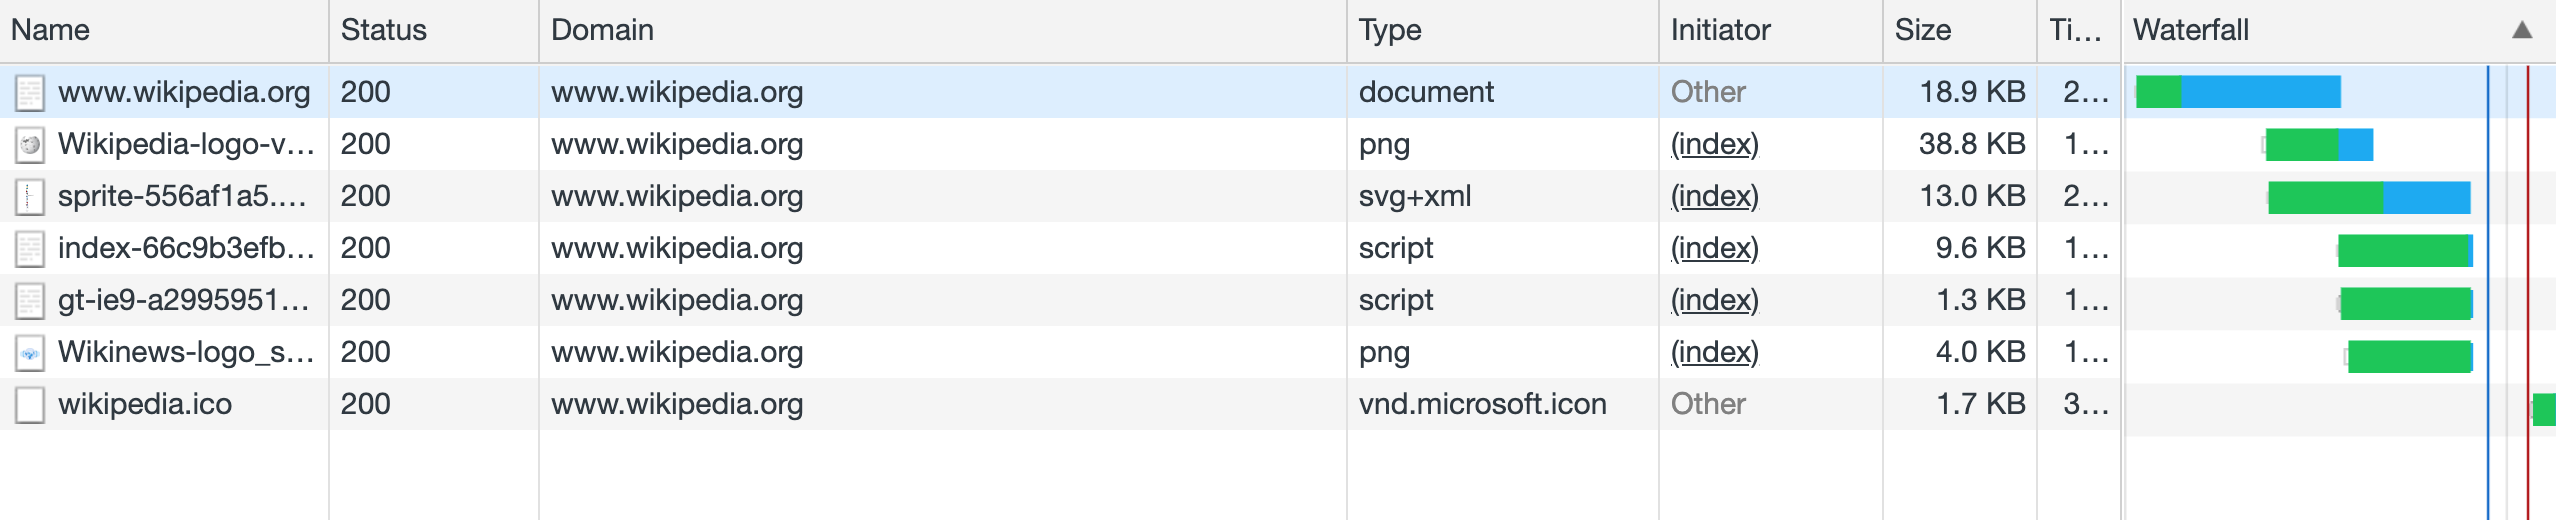
You can also see the requests your browser sends using Chrome DevTools or the Firefox Network Monitor. Load a website with these open and just start scanning through - you’ll learn a lot more about how your browser works behind the scenes.
HTTP Methods - GET and POST
We’ve only talked about how clients request data from servers, but clients can send data to servers, too. Every time you submit a form or upload a file, you’re sending data from client to server.
These are two methods clients use to interact with servers. When we fetch a website, our browser makes an HTTP GET request - we’re getting data. When you submit data in a form, your browser is sending data to the server using a POST request - you’re “posting” data.
There’s a lot more to learn here, and more HTTP methods we haven’t covered. Read more here.
URL Path
HTTP methods like GET and POST communicate the type of request you’d like to make. But you need to tell the server what you need.
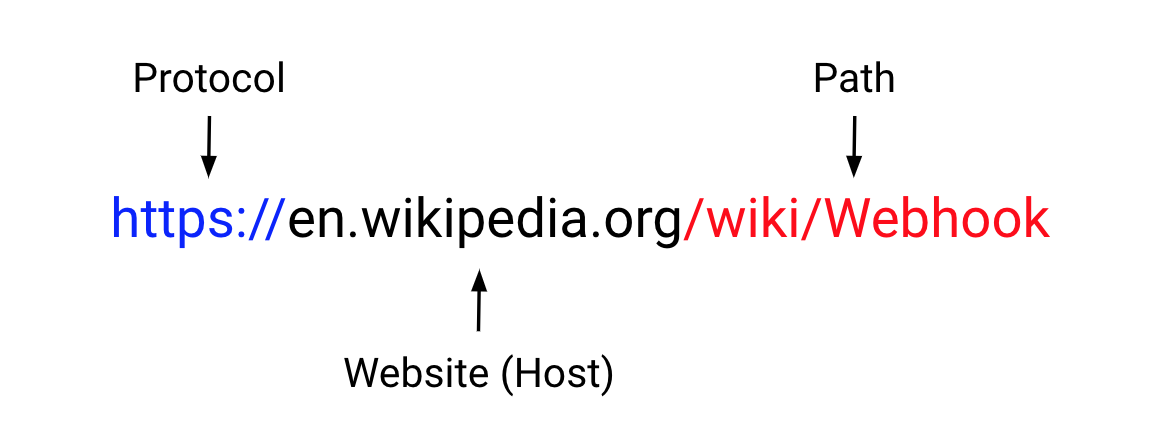
The URL for the Wikipedia article on Webhooks is:
https://en.wikipedia.org/wiki/Webhook
In English, this means you want the /wiki/Webhook article — the path — from the website en.wikipedia.org. You’re also going to talk HTTPS to that site. HTTPS is just HTTP with an extra layer of security. We’ll talk about it more below.
HTTP payload (Body)
When your browser submits a form to a website, you’re sending an HTTP POST request. The form data itself is typically included in the HTTP payload (referred to as the “body” of the request).
When a webhook provider sends your app or server data, it’s also making a POST request. That data is sent in the body.
Normally, the request also includes information about the type of data in the body (JSON, XML, and more). We’ll talk about this “content type” declaration when we cover HTTP headers below.
Query String Parameters (URL)
GET requests don’t have a body, since you normally don’t send data in the request. When you get something, you just need to tell the server what you’re getting — the path of the URL requested.
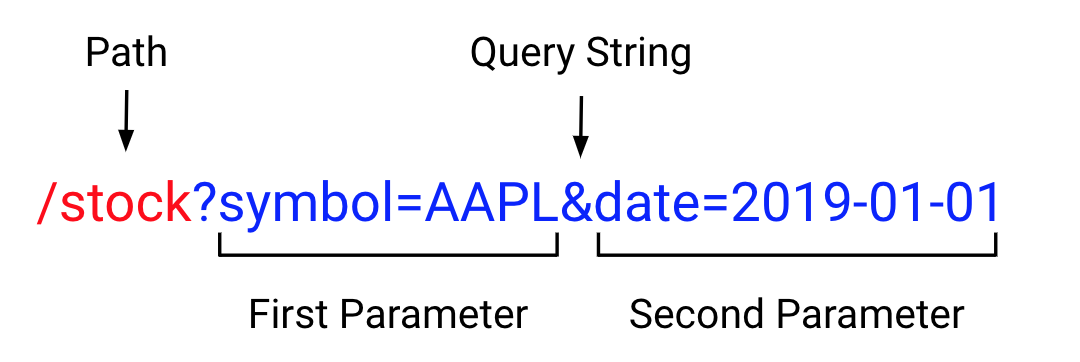
Sometimes the path doesn’t tell the server exactly what you need. For example, if you tell a server you want /stock data, the server naturally needs to know “what stock?” On some sites, you add query string parameters to communicate this:
/stock?symbol=AAPL&date=2019-01-01
First, ? tells the site you’re adding a query string.
symbol=AAPL is the first parameter, and date=2019-01-01 is the second. Together they tell the server exactly what data we need.
HTTP header
The path is usually specific to the website: you fetch a /wiki/Webhook article from Wikipedia but search Google at /search?q=test.
But other parts of the HTTP request are typically the same across the web. For example, when you make a POST request, your browser needs to tell the server the type of data it’s sending. It sends this in an HTTP header, a bit of metadata about the request.
This header is named Content-Type. If we’re sending JSON, our browser would pass:

If our browser language is set to US English, we’ll send the Accept-Language header:

Mozilla, as always, has an in-depth resource on headers.
HTTP Response
When you make an HTTP request, the web server returns an HTTP response.
This response also has a body — the data — and headers. When a server returns JSON, you’ll see:
among them. Note how headers like this can be included in both requests and responses.
HTTPS
HTTPS means “HTTP Secure”. Clients and servers still talk HTTP, but that HTTP traffic is encrypted in transmission.
Typically you refer to HTTPS as “HTTP over TLS”. TLS is the protocol used for encryption in modern browsers.
Most browsers tell you when you’re connecting to a site using HTTPS:
Any web service you control should send and receive data over HTTPS. It’s critical you secure users’ personal information, and HTTPS is one of many important mechanisms for doing so.
Endpoint
An endpoint is simply a URL that points to some web service.
This service can be an API hosted by a third party app, or it could be an endpoint on your server you’ve configured to accept requests from webhooks.
Webhook Provider
We refer to webhook providers in this article as third party apps and services that provide webhooks.
Google, Twitter, Facebook, and thousands of other services are webhook providers.
API
An API is an Application Programming Interface. The interface is usually a set of HTTP endpoints that your app or other services can interact with in a clearly-defined manner.
For example, Stripe provides an API for billing. Business enable billing and subscriptions on their own sites using Stripe. For example, you can create a new subscription for a customer by sending a POST request to their API. You can list all your active subscriptions by making a GET request to that same API endpoint.
JSON
JSON is a human-readable data format commonly used to encode information passed between web services. If you’ve ever worked with APIs or webhooks, you’ve probably seen JSON:
JSON stands for “JavaScript Object Notation” because it was inspired by the format used by JavaScript to declare objects — collections of keys and values like “name”: “Alice”.
JavaScript objects and JSON have a lot in common, but most programming languages can read JSON or convert data from the language into JSON.
This is powerful. A web server might be manipulating data in some programming language you’ve never heard of, but when they send you that data in a webhook request, you just get JSON.
When you POST data to an API, you’re also typically going to send JSON.
Metadata
Metadata is data about data.
HTTP headers are commonly referred to as “request metadata”. The request contains the data — the path, query strings, and payload — and the metadata — headers that tell the server a bit more information about that data, like the type of content, the size of the payload, and more.